Sunday, February 27, 2011

Our graywater system

We now drain all our graywater to the yard: kitchen sink, bathroom sink, bathtub, and washing machine.

Washing Machine

I set up the washing machine a few weeks ago, using Oasis Design's "laundry to landscape" method, which relies on the pump of the washing machine to move the water. This allows us to send the water slightly uphill, into our backyard "shrub thicket" of blueberries and serviceberries, where a gravity-fed system couldn't reach.

PE Pipe Exiting Garage
Our washing machine drain pipe wasn't the right size or type to use a barb to transition directly to the 1" polyethylene (PE) pipe. So, I used large-ish hose clamps (metal ring with a screw that ratchets the clamp smaller and smaller as you tighten the screw) to attach the washing machine drainpipe to a rubber tube we had around, which then attaches to the PE pipe. We placed the washing machine against the south wall of the garage, where I drilled a hole just large enough for the pipe to exit the garage. I included a vertical piece 6' tall to allow proper venting and as an overflow escape if something clogs the pipe. This prevents burning out the washing machine pump.

Pipe Layout
The pipe extends about 10' due south from the garage wall, then takes a 90 degree turn to the west before running another 30'. I drilled 1/4" holes into the bottom of the pipe every 2' or so. We'll use stumps and logs to pin the pipe into place, preventing the chickens from moving it around.

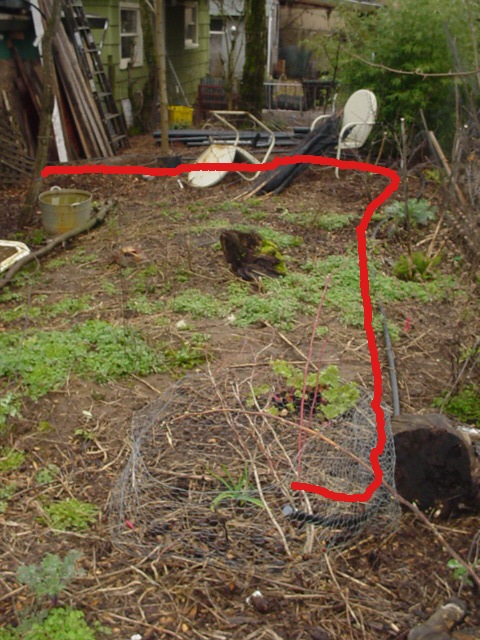
This pipe doesn't work perfectly yet. Despite my efforts to raise up the path next to the garage wall (see the bare dirt in the first picture above), the pipe still dips down before heading gradually upslope to the discharge points. This means most of the water exits through the first couple of holes, and that the last bits of water stagnate in the low spot by the garage wall. I may reconfigure the setup so the pipe still dips to cross the path, but then immediately jumps up and anchors to the black locust trunk visible in the picture above. That would allow a continuous feed downhill to all the discharge points, giving a fairly even irrigation pattern. I can add a joint or cleanout valve or something at the garage wall low point to remove crud that builds up, or drain the hose before hard freezes.


Sinks & bathtub

The rest of the house drains feed a mini constructed wetland in the front yard, which lies slightly below the house, allowing gravity fed flows. If we didn't have to worry about house resale, we could have done what Oasis Design calls "radical plumbing", just piping each drain directly to the outside with one 1" polyethylene pipe for each drain. In that scenario we wouldn't need any vents or p-traps or larger pipe, since we wouldn't have a connection to the sewer system. However, we're including a plumbing valve under the house so that the graywater can be sent either to the wetland or to the sewer, so we needed to use standard 1.5" ABS pipe complete with vents to the roof.

The wetland resides in an old fiberglass jacuzzi I got for free from craigslist years ago, about 6'x4'x3'. I plugged up all the holes in the tub using rubber patches and 100% silicone caulk. In 2007 or 2008, I dug a big hole in the front yard, just across the main path running by the north edge of our house, and buried the hot tub pretty close to level, but making sure it tipped slightly away from the house, so the overflow would drain into the adjoining garden bed. I made the top of the tub level with the path, or perhaps even slightly lower. Over the years we've built the paths up several more inches, so the tub is now uncomfortably low. Back then, I wanted to make sure we could gravity feed from the house drains into the tub, and we did not yet have plans to lift the house. Had I known then we'd wind up raising the house 3', I'd have made the tub higher. Woulda saved me some digging, too!


Original wetland, marble slate overflow, & hole dug for new bath tub

Molded dirt and marble slate for overflow
We put a few inches of dirt into the bottom of the tub, and planted it with cattails, rushes, wapato, and tule. For a couple of years, we just dumped graywater directly into the tub from 5 gallon buckets placed under the kitchen and bathroom sinks. We had no access to the underside of the house, so no way to use the bathtub graywater.

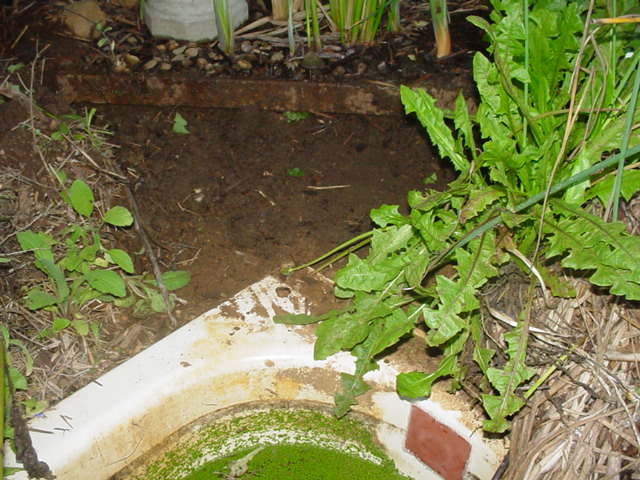
At some point I buried a bath tub (again, free from craigslist) to receive the overflow from the wetland. I leveled the new bath tub to overflow away from the house again, to keep moving any excess water further into the garden bed area. I tried to strategically compact dirt to control the wetland overflow location, and to use a scrap piece of marble slate to catch the water and carry it down to the new tub. Unfortunately, lots of water seeped through the dirt and was lost to the soil in the surrounding paths. The marble slate wasn't quite long enough to properly reach between the tubs, so we lost yet more water. All in all, probably 20% or less of the input water made it into the second tub.

Furthermore, the water in the wetland stagnated somewhat, smelling a bit nasty when we pulled it up from the bottom of the tub. When we poured graywater into the tub, it followed the path of least resistance, mostly across the surface of the tub straight to the overflow area. So we were concerned that the plants weren't having a chance to purify the water much. We decided to follow the method described in Toby Hemenway's Gaia's Garden, and fill the wetland with gravel and baffles. The rocks in conjunction with the oygenating plant roots supposedly help create a combination of aerobic and anaerobic sites for microorganisms to live, eating the other microorganisms and solids coming in with the graywater.

Our friend Nat loaned us a concrete mixer, and helped me make a run with his trailer to buy half a cubic yard of 3/4" gravel. We held a work party and used the mixer to wash off the rocks, to minimize the dirt we'd be introducing into the system. (Dirt will eventually clog up the spaces between the gravel and dramatically slow the water flow through the wetland.) We placed a vertical inlet pipe into the end closest to the house, and another vertical pipe near the overflow area; both pipes have many holes drilled into them to allow water flow. We placed larger river rock (~1.5"-3", a byproduct of my excavations under our house) around those pipes. I based this decision on the literature I read; I think it helps with allowing optimal water flow, or perhaps it helps trap the gunk coming in from the house without clogging up the smaller rocks?

We filled the rest of the tub with the smaller gravel, building up vertical baffles using sturdy scrap plastic (mostly square lids from 4 gallon buckets). The baffles force the water to take a long, circuitous route right, then left, then right, then left through the wetland, giving the plant roots the most time possible to clean the water before it finally overflows at the far right edge of the tub.

Current setup - second tub in background
The drain pipe from the house will enter into the vertical inlet pipe (foreground), dropping the graywater to exit through the drilled holes and begin its journey through the wetland. I still have to finalize the plumbing under the house, so the pipe into the wetland temporarily discharges onto the surface (smear of goop at lower left), rather than into the inlet pipe. I installed the second vertical pipe near the overflow area (not visible, as it extends only 2" above the surface) to allow insertion of a siphoning hose; supposedly it helps the plant roots penetrate deeper down if you drain all the water out now and then. I've only tried once to siphon the water, with partial success; I dropped the water level by maybe 6", but couldn't get more than that to work. Partly I ran into difficulty starting the siphon without getting my mouth all over a graywater-smeared pipe; some sort of mechanical suction device may help with this. Finally, we replanted the old cattails, tule, and rushes, and topped everything with some wood chip mulch.


Ready to install pond liner scraps for new overflow
A few months ago, I fixed the overflow setup, by replacing the marble slate with some scrap pond liner from our ecoroof project. Now most of the overflow makes it down into the second tub.

I assume in the winter, with the wetland plants dormant, we get very little treatment, so I'm careful not to use the water from the second tub for anything where contamination may cause problems. In the summer I feel comfortable using the water to irrigate, rinse roots, wash my hands, etc. However, we haven't done any water quality testing, which would be necessary to establish how well the wetland actually treats the water.

Derrick Jensen free event in Portland

The most important author of our time will speak at a free event in downtown Portland: Pacific Northwest College of Art, Main Campus, Swigert Commons, 1241 NW Johnson St.

Friday, February 25, 2011

Self Sufficiency, Five Years In

I gave a presentation last Monday on our progress, successes, failures, and lessons from five years of working towards self sufficiency at our current house. I advertised the event with this blurb:

In March of 2006, Tulsi and Norris purchased a small house on a .2 acre lot, and used permaculture principles to design their food forest, sun garden, and house renovation. They aimed to create a low-maintenance, truly sustainable habitat for 2-4 people plus wildlife, providing from the property all necessary food, heating & cooking fuel, water, and waste treatment. Join us for a reality check on what's worked and what hasn't, what seems theoretically possible for the future, and what all this means to the oxymoronic goal of a sustainable city.

You can view a PDF (6 MB) of our presentation slideshow. I went into a lot more detail during the presentation than what I was able to write out on the presentation slides, but you can still get a good idea of our journey from looking through the slides.

UPDATE April 2014: I have now created a slideshow with audio synced to the images. View Self Sufficiency, Five Years In online (may require reasonably fast internet connection) or download 36MB zip for offline viewing. (Extract to anywhere on your hard drive, then open the included index.html file in your web browser.)

Saturday, February 12, 2011

Cost of Portland water & implications for rainwater harvest

Water supply vs sewage costs

Range in cost per gallon

This sounds like a very dull question, but here goes anyway: when does your tap water in Portland cost a third of a penny per gallon, when does it cost 1.3 pennies, and when does it cost 3.1 pennies? Short answer: if you're irrigating your garden in the summer, that water probably costs you .37¢ per gallon. During some of the winter, that water probably costs you 1.29¢ to the gallon. But during a certain portion of the winter, your water use will cost you 3.14¢, or possibly 4.06¢ per gallon, due to the way the Portland Water Bureau (PWB) estimates your sewer usage through the year.

Explanation

You can read about this process directly from PWB, but I'll take a shot at summarizing what I find to be somewhat confusing language.

In the following discussion, "one unit" means 100 cubic feet of water, which equals 748 gallons. PWB measures and bills based on these "units."

PWB bills you separate prices for water supply ($2.733 per unit) vs sewer usage ($6.92 per unit), but only measures the water you pull in from their supply; they don't measure how much water you actually put down the sewer. They assume that during the winter and early to mid spring months, you aren't washing your car, watering your lawn, or irrigating your garden, so any water you use from the supply is going down the sewer. So they use your water usage during the billing cycle which falls into that timeframe to establish your "winter average water use." Any water you use above and beyond that amount during the rest of the year is only billed for the cost of the water supply, not for the sewer usage.

For example, if during the key winter months, you use 5 units of water, then during those months you'll be billed for 5 units worth of water supply, and 5 units of sewer usage. If during the summer irrigation period you use 15 units of water, you'll be billed for 15 units of water supply, but still only 5 units of sewer usage. If in late fall and early winter you only use 4 units worth of water, you'll be billed for 4 units for water supply and sewer usage.

Since the sewer charge costs more than twice as much as the water supply cost, this matters a great deal to your bill! Every unit of water you conserve during the crucial "winter average water use" period saves you not only the cost of the water and sewage for that period ($2.733 + $6.92), but most likely saves you $6.92 for the late spring/early summer sewage charge, and another $6.92 for the summer through fall period. In total, you save $23.49 per unit conserved over the course of that year (3.14¢ per gallon). If you wind up using more water during your fall through early winter period than you did during the "winter average water use" period, then you'll save another $6.92, bringing your savings up to $30.41, or 4.06¢ per gallon.

Two notes on this phenomenon

If you move into your residence after (or too late during) the "winter average water use" period, then PWB assumes you're a standard super wasteful household and sets your value to 15 or 18 units (!!!). Considering that we normally use 2 or 3 units in the winter, that really screwed us the first year we moved here as we irrigated a lot during the summer.

If you use 0-2 units during the key period, the city sets your default to 7 (!?!). So if you're super frugal, you'll want to keep an eye on your meter towards the end of the key period, and run a lot of extra water if needed, to get yourself to 3 units.


Winter average water use months

The PWB webpage says "For residential accounts billed quarterly, the city calculates the winter average on water readings taken between February 1 and April 30." Some people may have their billing cycles fall clearly into the middle of this range. ie, if each year your quarterly billing cycle looks something like June 2nd - September 1st, September 2nd - December 1st, December 2nd - March 1st, March 2nd - June 1st, then you'll know that your key period is always going to be roughly the months of December, January, and February.

Our billing cycle falls right around February 1st, sometimes a day or few before, sometimes a day or few after. So it's not clear to us each year whether we need to focus on November, December, and January, or on February, March, and April.

If your billing cycle offers you similar ambiguity, or if you just plain find all this confusing, you can call PWB customer service at 503-823-7770 with your account number and ask them which billing period will determine your winter average water use.


Rainwater harvest

People get very excited about rainwater harvest in the pacific northwest. Rain barrels abound! Water just pours off our roofs all winter long! Unfortunately, our climate does not lend itself well to self sufficiency in rainwater storage, since we get most of our rain during the cold months of plant dormancy, and then get almost no rain during the summer months of heat and active growth. So if you're trying to see your entire yard through the three month drought with stored water, most of your water storage will get filled once, over the winter, then drained once during the summer, giving a very low efficacy, and thus a very long economic payback period on anything beyond about 400 gallons worth of storage per 1000 square feet of roof area. I figure it thus:

Payback Calculations

A good price on a 55 gallon rain barrel is $10 used (let me know if you have information on cheaper sources, since that changes these calculations a lot!). (I've seen similar deals on 250 gallon totes, which go for $50 as a good price.)

Each time you fill and drain your 55 gallon rain barrel during the crucial winter average water use months, you save $1.73 - $2.23 in that year (the range based on whether you save on sewage charge for all four quarterly bills that year, or only three). If you use 2 gallons a day (say, washing off roots, tools, and your hands) over 90 days, you save $5.65 - $7.30. Payback in less than two years! But of course, it's raining more or less all the time, and you're probably not doing much outside that demands water use, so you probably only need to put in one barrel for this payback. For that matter, you can go pretty far with a few five gallon buckets under your downspouts for no cost at all.

Each time you fill and drain your barrel during the rest of the year, you save 20 cents. You need to fill and drain the barrel 50 times before it'll pay for itself. During what I call the "swing months", of April, May, June, and September, you may get decent usage from your rain barrel, as we often go a week or more between rainfalls, and plants can benefit from the water you've stored in your barrel, which then gets refilled in the next rainfall. A barrel may get drained and filled 8-12 times across those months and during the few summer rains, saving you $1.60 - $2.40 in water costs, thus paying for itself in four to six years. Here a rain barrel clearly wins out over dealing with a bunch of five gallon buckets, especially if you integrate the rain barrel into a gravity-fed irrigation system so you're not hauling the water around.

Optimal Storage Capacity

Here are some rough ideas on how much storage capacity will be usefully used during these months. Looking at some historic precipitation data I would target at least enough storage to hold the water from a .5" rainstorm on your roof. A 1000 square foot house footprint would yield 280 gallons of water (1000 ft * .5" / 12 gives you the cubic feet of water, times 7.48 to convert from cubic feet to gallons, times .9 to account for the water lost to evaporation and other loss.) So about five rain barrels per 1000 square feet of roof catchment area. I estimate from looking at the last few years of rainfall, that you'll get spells of .75" or more maybe three or four times a year. So you could have another 140 gallons of storage, say two or three barrels, each of which would save you 60 or 80 cents per year, and pay for themselves in 12 to 16 years. Beyond that and you get only one or perhaps two uses of your barrel per year, so it takes 25 to 50 years to pay for itself.

A single 250 gallon tote would come close to my targeted 280 gallons of storage per 1000 square feet of catchment, assuming that you can direct all that water to the tote. Multiple rain barrels gives you more flexibility in positioning them in different areas, though of course it then requires additional work to visit them all to drain them into garden areas.

Other considerations

Of course, water costs will continue to go up, especially if the city moves ahead with its plan to give tons of money to private contractors with good connections to create treatment plants the system doesn't really need. (Look into this and get active if you plan to remain a PWB customer.) So you could assume water costs will double, and thus bring the payback period way down for the barrels. You do the math.

If you can get rain barrels for less than $10 each, or find another way to store water for less than 18 cents per gallon, then again that improves the payback time on the water storage, in a direct proportional relationship. (Cutting the cost in half cuts your payback time in half.)

If you're planning a multi-barrel system, odds are good that you'll be buying some hardware to connect the barrels together, maybe lumber to support them, and perhaps irrigation pipe above and beyond what you would otherwise purchase. Be sure to include that in your total costs to determine your payback time.

If your garden area to be irrigated by the rainwater is too small to allow you to usefully apply all the water from your storage, then your payback time increases. Be sure to position your barrels to give you the greatest likelihood of actually using them between rainfalls. Place them uphill from your garden beds, and make them convenient to use.

Storage can start to take up a lot of space, fast. We originally wanted to have one or two multi thousand gallon storage tanks, but we realized they would each displace a small tree or large shrub. If you have a two story house and can fit the storage against your shady north side and still get the water to useful areas, losing that space doesn't hurt your food production all that much. Storing water under your house can save a lot on space, but then you need to figure out how to get the water out and up to your growing areas! A hand pump, or a small solar panel with a pump may work, but of course add to the cost and thus to the payback time.

A Final Word

Soil gives you the cheapest water storage. Build organic matter so it'll hold more water!

Tuesday, February 01, 2011

Plan for root crops

Here I'll lay out a rough idea of how many of which roots I would grow and eat on this site on an annual basis. I'm only including truly perennial, plant-replant perennials, and self-seeding biennials. We've had very poor success with growing annual root crops (carrots, beets, turnips, rutabagas, etc), most likely due to a combination of slug pressure and our unwillingness to baby the tiny plants (tilling/killing the soil into a fine seedbed, weeding, and watering).

Seasonal availability

I've found from our harvests this year that we have plenty of roots in the fall, winter, and early spring, with jerusalem artichokes, skirret, mashua, and yacon forming the bulk of our harvests. Wapato, oca, and canna lily all have potential for providing substantial harvests, but I only try in this post to estimate the future contribution of oca. For now I'll assign wapato and canna lily to the category of "minor roots", which add some diversity to our diet and to the garden, without any individual species providing a significant harvest.

We need to plan most carefully for root harvests from mid spring through late summer. Annual roots could fill the gap, but I'm not planning for them in our future harvests.


Summer harvestable rootsMinor roots
PotatoEvening primrose
CamasSolomon's seal
Dandelion (year round)Lovage
Yellow asphodel (year round?)Sweet cicely
Campanulas?Fennel
Cinnamon vine bulbilsCinnamon vine taproots
Scorzonera (year round)Sea kale
Grape hyacinthLily
Triteleia spEarth chestnut
Brodiaea spWoodland chervil
Dichelostemma spBurdock
Erythronium spDahlia
Annual rootsDaylily
Scilla
Orpine
Parsnip
Chinese artichoke
Wapato
Canna lily

For details on these plants, see my notes on perennial roots part one and part two.

Consumption

Daily average

I figure I could eat about 2 ounces per day of garlic, elephant garlic, shallots, and other perennial oniony bulbs. On top of the garlic, I'm targeting 12-14 ounces per day of other roots. I suspect I'll eat more roots in the winter, and fewer in spring and summer when I have more greens and fewer roots available.

Monthly root consumption

December - March (four months)

Harvesting skirret, jerusalem artichoke, and minor roots from ground as needed. All mashua, yacon, and oca should have been dug after the first hard frost; now eating them from storage.
RootPounds (all 4 months)
Skirret30
Mashua25
Oca25
Jerusalem artichoke10
Yacon10
Minor roots5

April

Skirret and stored roots starting to sprout, so eating the last of them. Relying more heavily on jerusalem artichoke
RootPounds
Jerusalem artichoke12
Mashua5
Oca5
Skirret3
Yacon2
Minor roots1

May

Not much available
RootPounds
Jerusalem artichoke (preserved via fermentation)10
Dandelion5
Scorzonera3
Yellow asphodel1

June & July

Early potatoes & some other roots now available as summer drought kicks in. Harvest all camas to cook as one big batch.
RootPounds (total for two months)
Camas20
Potato6
Jerusalem artichoke (preserved via fermentation)5
Yellow Asphodel5
Cinnamon vine bulbils5
Dandelion4
Scorzonera3
Grape hyacinth2

August

Mostly relying on starch-rich potatoes and cinnamon vine bulbils, with miscellaneous inulin roots providing some variety
RootPounds
Potato8
Cinnamon vine bulbils8
Yellow Asphodel3
Scorzonera3
Dandelion3
Campanula sp1
Grape hyacinth1

September

Similar to last month, but cinnamon vine bulbil production may have slowed down??
RootPounds
Potato10
Cinnamon vine bulbils3
Scorzonera3
Dandelion3
Yellow Asphodel2
Campanula sp1
Grape hyacinth1

October

Skirret available again!
RootPounds
Skirret10
Potato10
Jerusalem artichoke8
Minor roots2

November

Assuming we don't get a hard freeze yet, so not harvesting mashua/oca/yacon yet
RootPounds
Skirret16
Jerusalem artichoke11
Minor roots3

Annual root totals

RootPounds to eatPounds to replant
Skirret59
Jerusalem artichoke56
Garlic/elephant garlic455
Potato345
Mashua30
Oca305
Camas20
Cinnamon Vine bulbils16
Dandelion15
Yacon12
Scorzonera12
Minor roots11
Grape hyacinth4

Land required

I won't try to give square foot requirements for each root, as I would mostly operate on guesswork. Jerusalem artichokes and mashua yield us about 3 pounds per square feet, and I suspect I could grow them together to make even more efficient use of space. Yacon, potatoes, oca, and skirret in the sun should all yield .5 pounds per square foot or more. So all in all I'll assume a conservative average yield of .5 pounds per square foot, giving a requirement of about 700 square feet of growing space.


Note on jerusalem artichokes

To make the inulin of our jerusalem artichokes digestible, I've started cooking them for 2-3 days as we run the woodstove (usually one fire in the morning, and one in the evening), so that they cook for at least 10 hours total. If we didn't have the wood stove running anyway, it wouldn't make nearly as much sense to rely so heavily on this root as a staple. (Though I still need to experiment with fermenting the jerusalem artichokes--many people do this, and I've heard it helps with the inulin.)

Roots as chicken fodder

Prioritize yield and ease. I think mashua and jerusalem artichoke make the most sense, though I have to admit that our chickens have not been very excited about jerusalem artichokes cooked for 1-2 hours til mushy. I haven't yet tried feeding them roots cooked for 10 hours, or tried feeding them mashua.

If chickens will eat cinnamon vine bulbils, and if the chickens don't peck the young shoots to death, these could work very well as a self-foraged summer starch.